Ever thought about building your own PC but felt it might be too daunting? Fret not! It’s actually much simpler and way more rewarding than you might think. Creating your custom gaming rig means getting exactly what you want without paying extra for unnecessary parts. Whether you’re an amateur or an experienced builder, this easy step-by-step guide will teach you how to build your own PC from scratch!
Is it really cheaper to build your own PC?
One big reason people consider DIY PC builds is the potential cost savings. By picking each component yourself, you avoid the labour and brand mark-ups that prebuilt manufacturers charge. Local data suggests that a mid-range custom gaming PC build might cost around $800–$1,000, whereas a pre-assembled PC with similar specs could be $1,500 or more. To see where these differences come from, let’s compare a hypothetical DIY build to an equivalent prebuilt system using current 2025 prices in Singapore:
| Component | DIY Build (Approx. Cost) | Prebuilt PC (Same Specs) |
| CPU
Intel Core i5-13400F (13th Gen, 10-core mid-range processor) |
$200 | Included (same i5-13400F) |
| GPU
NVIDIA GeForce RTX 3060 (12GB graphics card) |
$485 | Included (same RTX 3060) |
| Motherboard
B760 chipset board (for Intel 13th Gen) |
~$150 | Included (comparable board) |
| RAM
16GB (2×8GB) DDR4 memory |
~$80 | Included (16GB installed) |
| Storage
1TB NVMe SSD (PCIe SSD for OS and games) |
~$100 | Included (often 512GB–1TB SSD) |
| Case & Fans
ATX Tower Case + cooling fans |
~$100 | Included (standard case & fans) |
| Power Supply
650W PSU (80+ Bronze rated) |
~$100 | Included (with system) |
| CPU Cooler
Air cooler (if not included with CPU) |
~$40 | Included (stock or basic cooler) |
| Operating System
Windows 11 Home (64-bit) |
~$150 | Included (pre-installed) |
| Total Cost | ≈ $1,300 (DIY parts + OS) | ≈ $1,600 (prebuilt system) |
How to build your PC: The plan, budget and the works

Before we wield the screwdriver, it’s crucial to plan your build. This means deciding what you want from your PC, setting a budget, and choosing compatible components that will bring your dream rig to life.
Define your PC’s purpose
Are you building a hardcore gaming machine for the latest AAA titles, a simple desktop for browsing and office work, or a balanced PC for both gaming and productivity? For instance, a gaming rig will prioritise a powerful Graphics Processing Unit (GPU), whereas a general-purpose PC might put more budget into a fast storage drive or a quieter case. Also, consider what games or software you want to run – check the recommended system requirements of those programs or games.
Set a budget
You can build a solid gaming PC at various price points; having a budget in mind will narrow down component options. Remember to account for all components (listed below) and also any peripherals (monitor, keyboard, etc.) or an operating system license if you need those. The great thing about PCs is that you can always upgrade later, so you can start with a modest build and improve it over time if needed.
Ensure compatibility
All your chosen parts must work together. Nothing’s worse than realising your new CPU doesn’t fit your motherboard, or your power supply can’t handle your graphics card. Make sure, for example, that your motherboard has the correct socket for your CPU, that it supports the RAM type (DDR4 vs DDR5) you picked, and that your power supply unit (PSU) provides enough wattage for your CPU and GPU at full load.
An easy way to check this is to use a tool like PCPartPicker, which lets you select components and will alert you to any incompatibilities. Using such a tool, you can plan out your build, select compatible parts, and even check pricing and availability across retailers.
Pro tip: PCPartPicker also estimates your build’s power consumption and suggests a suitable PSU wattage
Source your components
Once you have a parts list, purchase your components from reputable vendors. You can shop online for convenience or from trusted tech retailers. When your parts arrive, inspect them to ensure nothing is damaged or missing.
Now, let’s go over the key components you’ll need for a custom PC build. Below is a breakdown of each component’s role and some beginner-friendly tips for choosing the right one:
| Component | Role in the PC | Tips for Choosing |
| CPU (Central Processing Unit) |
|
|
| GPU (Graphics Processing Unit) |
|
|
| Motherboard |
|
|
| RAM (Memory) |
|
|
| Storage (SSD/HDD) |
|
|
| Power Supply Unit (PSU) |
|
|
| Case (Chassis) |
|
|
| CPU Cooler (Air or Liquid) |
|
|
In addition to the parts above, you’ll also need an Operating System (OS) (e.g., Windows 11 or a Linux distro) to install on your new PC so you can use it, and consider peripherals like a monitor, keyboard, mouse, and headset. These aren’t part of the PC build itself, but they’re essential to actually use and enjoy your new rig. If this is a gaming PC, you might already have these, but if not, be sure to factor them into your budget.
Prepare your tools and workspace
Now that you have your parts, make sure you have a suitable place and basic tools to put everything together. You don’t need a workshop – just a clear, large surface (a table or desk) to work on and a Phillips-head screwdriver (a #2 screwdriver fits most PC screws). It’s wise to stand on an uncarpeted floor or use an anti-static wrist strap while building to avoid any accidental static shocks to components.
Also, grab a small container or tray for holding screws, and have your motherboard manual handy – it’s a lifesaver for finding what goes where.
Step-by-step PC assembly guide: How to build your gaming PC
1. Prepare your case and install the power supply (PSU)
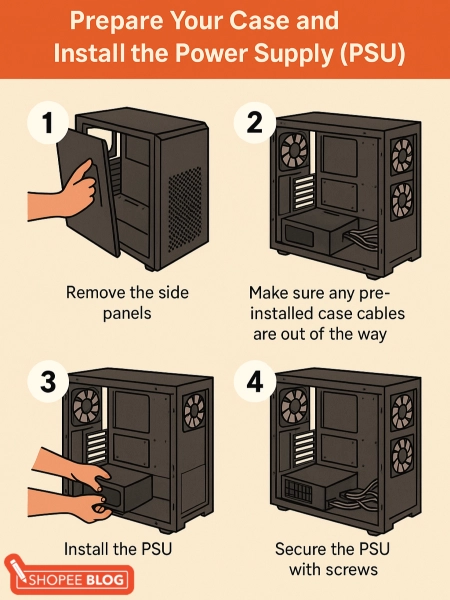
- Remove the side panels (usually one thumb-screws or sliding panels at the back) to expose the inside of the case.
- Before installing components, check that any pre-installed case cables (front panel cables, fan wires) are out of the way.
- Now, install your PSU. Typically, the PSU goes in a slot at the bottom rear of the case. Slide it in from the side or back (depending on case design) so that its screw holes align with the case’s holes.
- Ensure the PSU’s fan faces the correct direction (downwards if your case has a bottom air vent with a dust filter, or upwards if the case sits on carpet or has no bottom vent).
- Secure the PSU with the four screws that came with it.
- If your PSU is modular (detachable cables), you can leave off unneeded cables for now; if it’s non-modular, you’ll have a bundle of cables – gently gather them and have them ready to plug into components as we go.
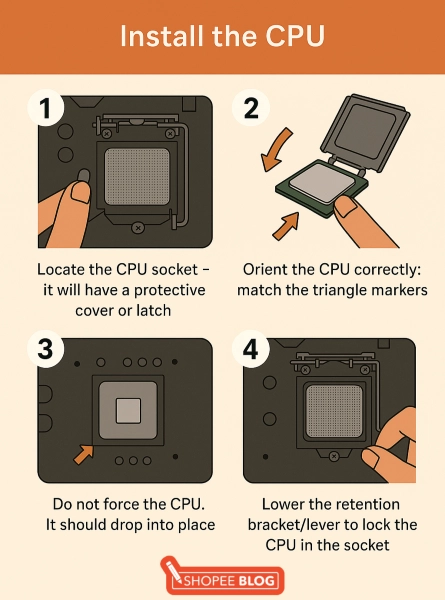
2. Install the CPU on the motherboard
- Gently place the motherboard on a flat surface (on top of its anti-static bag or the box it came in for cushioning).
- Locate the CPU socket – it will have a protective cover or latch.
- Release the socket lever or latch as per the motherboard manual.
- Now, take your CPU and orient it correctly: look for a small triangle or arrow on one corner of the CPU and match it to the triangle marker on the socket – this ensures the pins (or pads) align.
- Do not force the CPU. It should drop into place with zero pressure when aligned correctly.
- Once it’s in, lower the retention bracket/lever to lock the CPU in the socket.
Tip: Handle the CPU by the edges, avoid touching the gold pins or contacts on its underside.
3. Install the RAM modules
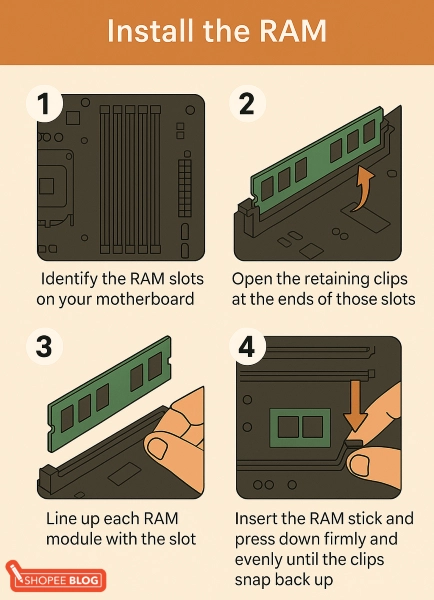
- Identify the RAM slots on your motherboard – long slots usually near the CPU.
- If you have two sticks of RAM, check your motherboard manual for the recommended slots to use (often you’ll skip a slot between them, e.g., use slot 2 and 4 for a 4-slot board).
- Open the retaining clips at the ends of those slots.
- Line up each RAM module with the slot – there’s a notch in the RAM stick that matches a bump in the slot, so it only goes in one way.
- Insert the RAM stick and press down firmly and evenly until the clips snap back up, securing the module.
- Repeat for the second stick. (If you ever need to remove RAM, you’d press the clips to pop the stick out.)
4. (Optional) Install an M.2 SSD

If your build uses an M.2 SSD (that gum-stick sized drive) for storage, now is a good time to install it onto the motherboard. Some builders do this later, but it’s often easier before the motherboard is in the case.
- Locate the M.2 slot on the motherboard – it’s a small slot, sometimes under a heatsink or label, typically between the PCIe slots or near the SATA ports.
- Remove the tiny screw at the end of the M.2 slot (don’t lose it!)
- Align the M.2 SSD with the slot at a slight angle (usually about 30 degrees) and slide it in – it only fits one direction, with the gold contacts engaging the slot.
- Once inserted, press the drive down flat; the notch on the end of the drive should align with the screw hole.
- Secure the SSD with the screw you removed.
5. Mount the motherboard (with CPU, RAM and SSD on it) into the case
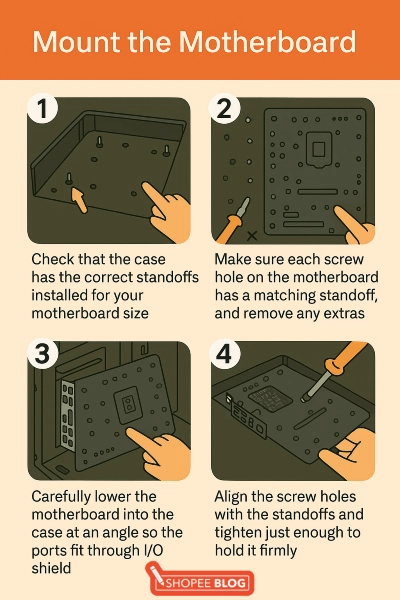
Double-check that the case has the correct standoffs installed for your motherboard size. Standoffs are small brass spacers that screw into the case and will support the motherboard. Many cases come with these pre-installed in an ATX pattern.
- Ensure there’s a standoff for each screw hole in your motherboard, and no extra standoffs that don’t line up.
- Adjust or add/remove standoffs as needed by twisting in/out with pliers or a socket tool.
- If your motherboard came with a separate I/O shield (the rectangular plate with cutouts for the rear ports), press that shield into the case’s I/O opening from the inside, ensuring it clips in snugly.
- Carefully lower the motherboard into the case, aligning the ports with the I/O shield hole and the screw holes with the standoffs beneath. It helps to angle the board slightly to get the ports through the I/O shield, then lay the board down on the standoffs.
- Once everything is aligned, use the screws to secure the motherboard onto each standoff. Do not over-tighten – just snug enough to hold the board firm.
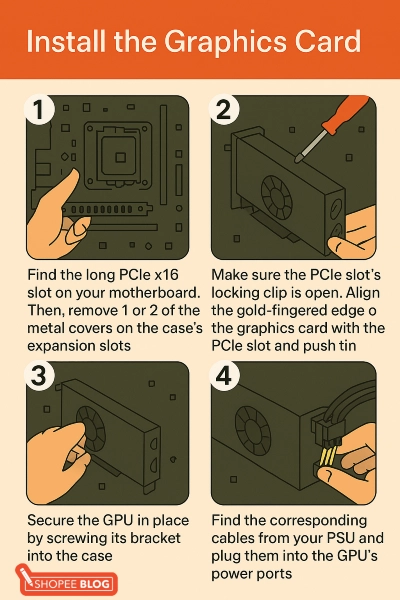
6. Install the graphics card (GPU)
If your CPU has integrated graphics and you chose not to install a discrete GPU, you can skip this step entirely.
- Find the long PCIe x16 slot on your motherboard (usually the top one, often with a metal reinforcement).
- Before inserting the card, you’ll need to remove one or two of the metal covers on the case’s expansion slots (the vertical slots at the back of the case aligning with the PCIe slot).
- Hold your GPU to the slot to see which part of the case it lines up with – typically, you remove the cover for the slot the GPU will occupy and the one just below it (GPUs are usually 2 slots thick). Remove those backplates (they may be held by screws or just snap out).
- Make sure the PCIe slot’s little locking clip is pushed open (at the end of the slot). Align the gold-fingered edge of the graphics card with the PCIe slot and firmly push the card straight into the slot. You should hear or feel the click of the slot’s clip grabbing the card, and the card’s output bracket will align with the open slots at the back of the case.
- Secure the GPU in place by screwing its bracket into the case (where you removed the slot covers).
- Finally, connect the GPU’s power cables: most gaming GPUs require one or two PCIe power connectors from the PSU (6-pin, 8-pin, or the newer 12-pin connectors).
- Find the corresponding cables from your PSU and plug them into the GPU’s power ports (they are keyed, so they only go in one way). Make sure they snap in firmly.
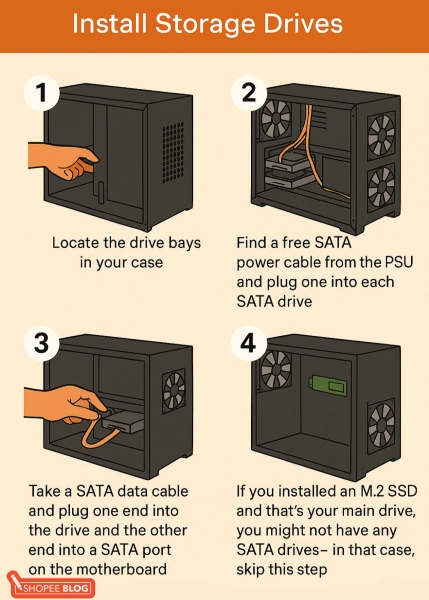
7. Install storage drives (2.5” SSDs or 3.5” HDDs)
If you have additional storage drives besides the M.2 we installed (or instead of an M.2), now is the time to put them in.
- Locate the drive bays in your case. Many cases have a hard drive cage for 3.5″ drives and/or mounting points for 2.5″ SSDs (sometimes on the backside of the motherboard tray or bottom of the case).
- For a 3.5″ hard disk drive, you might have a plastic tray: pull it out, secure the HDD in it (often tool-less via plastic pins or using four screws through the bottom/sides), and slide it back in.
- For a 2.5″ SATA SSD, you may have dedicated sleds or brackets – attach the SSD with screws to the bracket and screw the bracket into the case, or mount it as per your case’s design.
- Each drive needs two connections: power from the PSU and data to the motherboard. Find a free SATA power cable from the PSU (it will have a chain of flat connectors) and plug one into each SATA drive. They only fit one way (the L-shaped connector).
- Then take a SATA data cable (should be included with your motherboard) and plug one end into the drive (the smaller L-shaped port next to the power) and the other end to a SATA port on the motherboard. SATA ports are usually a cluster of small connectors on the motherboard’s edge. It doesn’t matter which port you use, just note if one is labelled SATA0 or SATA1 – that could be your primary for the boot drive.
If you installed an M.2 SSD and that’s your main drive, you might not have any SATA drives at all – and that’s fine, you can skip this step.
8. Connect front panel cables and other peripherals
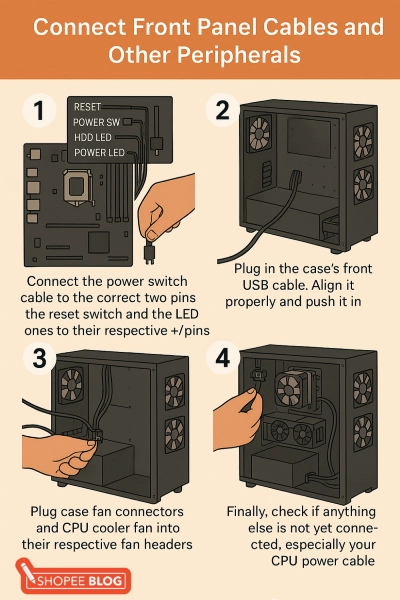
From your case, there will be a set of small cables usually labelled for Power Switch, Reset Switch, Power LED, HDD LED, etc. These connect to a cluster of pins on the motherboard called the front panel header. This is where your motherboard manual is invaluable – it will have a diagram of which pins correspond to which switch or LED.
- Connect the power switch cable to the correct two pins (polarity doesn’t matter for the switch), reset switch likewise, and the LED ones (power LED and HDD activity LED) to their respective +/- pins (polarity does matter for LEDs, so match the + and – as labeled).
- Next, plug in the case’s front USB cable – if your case has USB 3.0 ports on the front, there will be a thick cable with a blue (usually) 19-pin connector that goes into the motherboard’s USB3 header (a rectangular connector, often at the bottom or side of the board).
- Align it properly and push it in. Similarly, front audio: a cable labelled HD AUDIO (or AC97 for older) plugs into the motherboard’s audio header (usually at bottom-left of the board).
- Connect any case fans: if your case fans have 3-pin or 4-pin fan connectors, plug those into the motherboard fan headers (look for labels like CHA_FAN or SYS_FAN). If they have big Molex connectors (older style), attach them to PSU cables instead, but most modern fans use motherboard headers for speed control.
- Ensure the CPU cooler’s fan is plugged into the CPU_FAN header on the motherboard as well.
- Finally, do a quick pass and connect anything else not yet connected: for example, if your motherboard has an 8-pin CPU power plug at the top (which it almost certainly does), plug in the 4+4 pin cable from the PSU there (this is separate from the 24-pin main power which we’ll do next).
- It’s easy to forget the CPU power cable since it’s usually in a corner – but your PC won’t boot without it!
- Also, plug in the big 24-pin ATX power cable from the PSU to the motherboard’s 24-pin socket (this one is hard to miss; it’s the largest plug on the board).
- Double-check that the GPU power is connected (if applicable), and SATA power/data on drives are secure.
9. Tidy up cables (cable management)
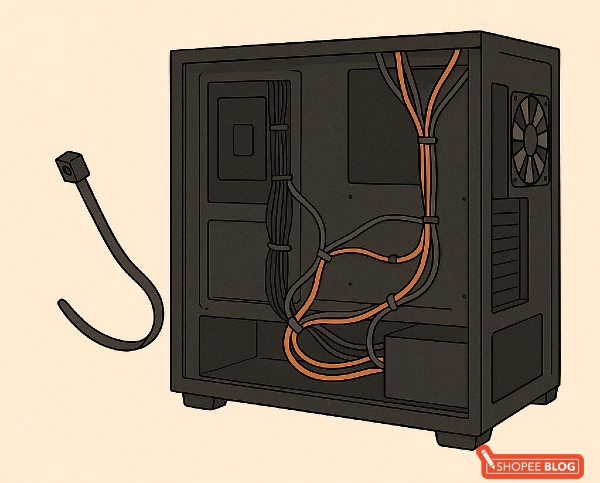
This step isn’t strictly required for functionality, but it’s highly recommended for airflow and aesthetics.
You can use zip ties (or the twist ties that came with parts) to bundle excess cable length and tie cables to the case’s provided loops or behind the motherboard tray. The goal is to keep cables out of the way of fans and give the interior a cleaner look, which also improves airflow so your components stay cool.
A clean build not only looks professional through that tempered glass panel (if you have one), but also makes it easier to swap parts later. Once done, you can put back any backside panel if you opened it for routing cables.
10. Moment of truth – power on and test
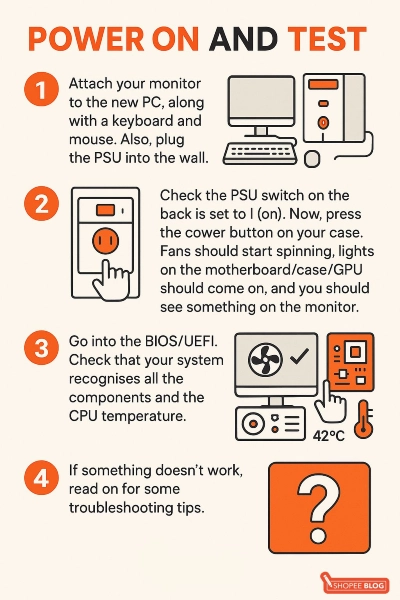
You’ve assembled everything and connected all the cables. Before you seal up the case, it’s wise to do a quick test boot.
- First, attach your monitor to the new PC (for most gaming rigs, connect your monitor cable to the graphics card’s output port – not the motherboard’s port). Also, plug in a keyboard and mouse, and plug the PSU into the wall.
- Double-check that the PSU switch on the back is set to I (on)
- Now, press the power button on your case. Fans should start spinning, lights (if any) on the motherboard/case/GPU should come on, and you should see something on the monitor – typically the motherboard’s logo or BIOS/UEFI setup screen.
- At this point, go into the BIOS/UEFI (usually by pressing the Delete key or F2 at boot – the screen usually tells you which key).
- In the BIOS, check that your system recognises all the components: the CPU is identified correctly, the RAM shows the right amount (e.g., 16GB), and your storage drives are listed. You can also check CPU temperature here to ensure the cooler is seated properly (should be at a reasonable idle temp, usually somewhere between 30 – 50°C).
- If something doesn’t work – say, no power at all, or no display – don’t panic.
Troubleshooting tips: If the PC won’t power on at all, re-check the power connections (24-pin and 8-pin CPU power especially) and the front panel power switch cable. If it turns on but nothing on screen, make sure the monitor is on the right input and connected to the GPU (or the motherboard if no GPU).
Many motherboards have little debug LEDs or beep codes – consult your manual if you have those, as they can indicate if, for example, the RAM isn’t detected (in which case, power off and try re-seating the RAM or try one stick at a time). Most issues at this stage come down to a cable not plugged in fully or a component not fully seated, so double-check those.
11. Install your operating system and drivers

Once your new PC passes the boot stage and can get into its BIOS, the next step is to get an operating system running.
If you’re installing Windows 10/11, you should have a bootable USB drive ready (remember we mentioned an 8GB+ USB drive earlier). If not, you can download Microsoft’s Media Creation Tool on another computer to create a Windows installer USB. For Linux, create a bootable USB with your distro of choice. Plug in this USB drive to your new PC. Then, power it on and either it will boot directly into the installer, or you might have to press F11/F12 or set the boot order in BIOS to boot from USB.
Once the installer starts, follow the on-screen steps to install your OS on your SSD/HDD (pick the SSD for faster boot times if you have multiple drives). After the OS installs and you reach the desktop, there are a few final tasks: install drivers and updates. Windows 11 will likely auto-install a lot of drivers, but you should download the latest graphics card driver from NVIDIA or AMD’s website for optimal gaming performance.
Also, install any necessary chipset drivers, audio/LAN drivers from your motherboard’s support page (Windows Update often handles these, but it doesn’t hurt to grab the newest versions).
Check that your resolution looks correct (installing the GPU driver will allow the proper high resolution). You should also head into the motherboard BIOS again and enable XMP or DOCP (for Intel or AMD) if you have high-speed RAM, to make sure your RAM runs at its advertised speed – this is an optional tweak, but a useful one for performance.
Now your operating system is up and running, and your custom-built gaming rig is ready for action! Install some of your favourite games or software and enjoy the machine you built. It’s a fantastic feeling to see it all working.
Common mistakes to avoid when learning how to build your PC
Even with a guide, mistakes can happen. Here are some common pitfalls to watch out for when building your PC, so you can avoid the “why won’t it turn on?!” moments:
Skipping the standoffs
Always ensure the motherboard is mounted on standoffs, not directly touching the case. An extra standoff in the wrong place or a missing one can short the board. Line them up with the screw holes on the motherboard beforehand to avoid any electrical shorts
Forgetting power cables
Remember to plug in both the 24-pin main power and the 4/8-pin CPU power cable on the motherboard (and GPU power cables if you have a graphics card). The system may power on but not actually boot if, say, the CPU isn’t getting power.
Not removing cooler protection
If your CPU cooler has a plastic film or cover on its base (some have a sticker over pre-applied thermal paste), remove it before installation. Forgetting to peel that off will prevent proper cooling (and lead to very high CPU temps).
Too much or no thermal paste
When installing the CPU cooler, using an excessive amount of thermal paste can be messy and using none is dangerous. A pea-sized dot in the centre of the CPU is enough – the pressure of the cooler will spread it. (If the cooler came with paste pre-applied, that’s already correctly measured.)
Forcing components
If something isn’t fitting, stop and double-check. Components like RAM, CPU, and GPU have specific orientations and keyed connectors. Forcing the wrong alignment can damage the parts. They should click in with firm pressure, not brute force.
Improper RAM placement
Use the correct slots as recommended by the motherboard for dual-channel operation. Also, ensure each RAM stick is fully clicked in. Partially seated RAM is a common cause of boot issues.
Plugging monitor into the wrong port
If you have a discrete GPU, the motherboard’s video outputs likely won’t work (many CPUs don’t have built-in graphics). Always connect your display to the graphics card’s ports, not the ones on the motherboard, to get a signal.
Static discharge mishaps
While rare, static electricity can fry components. Touch something metal or use an anti-static wrist strap while building, and avoid working on surfaces like carpet that generate static. Better safe than sorry.
Ignoring the PSU’s limits
Using a very old or low-wattage power supply to run power-hungry new components can lead to system instability. Make sure your PSU is up to the task (wattage and quality-wise) for the parts you’ve chosen, as an underpowered system may shut off under load.
Not updating BIOS/drivers
After building, sometimes the system might need a BIOS update (especially if you installed a brand new CPU on an older motherboard model). Also, performance can be sub-par if you don’t install your GPU drivers or motherboard drivers. Keep your system updated for the best results.
Turns out, learning how to build a PC isn’t rocket science
Building your own PC is not only rewarding (hello, awesome performance and a setup you can brag about), but it also empowers you with the knowledge to troubleshoot and upgrade your system in the future. Instead of a one-size-fits-all machine, you now have a computer that’s a perfect fit for you – and if you ever want to, consider upgrading to some of these best graphics cards.
And now that your rig is up and running, complete your setup with the best gaming mice or these amazing ultrawide monitors. Building your own PC is just the start of an exciting DIY adventure. Enjoy your new rig, and welcome to the PC master race!


