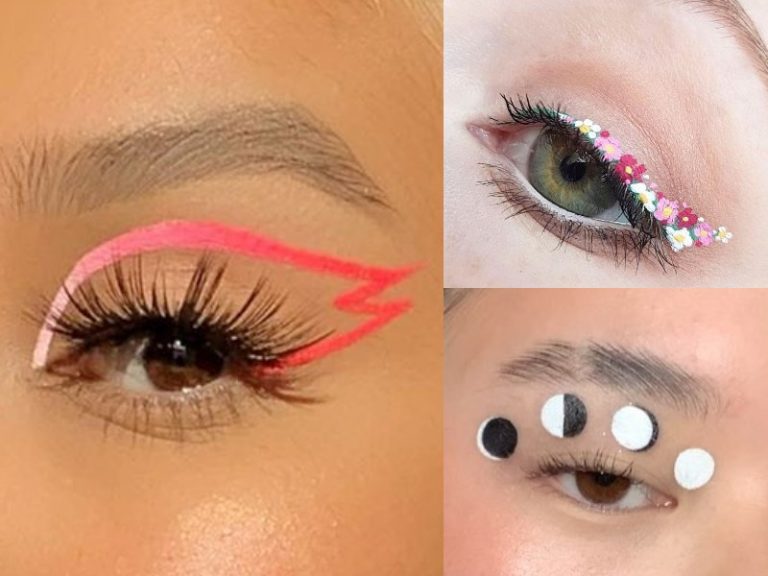
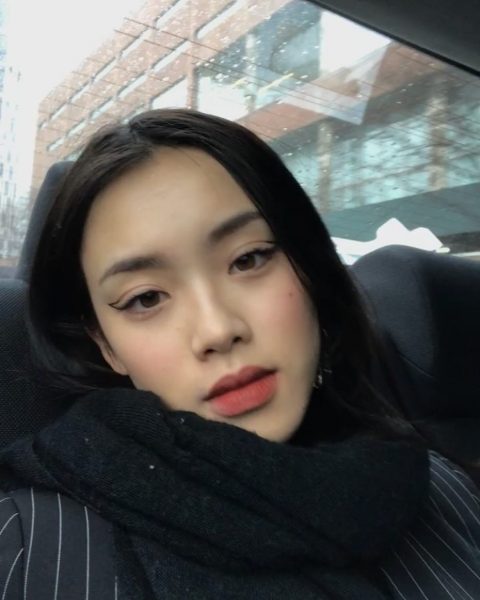
Rita Ora. Hunter Schafer. Jennie from BLACKPINK! These celebs have been going bold on our Insta-feed with their bright graphic eyeliner looks and it’s time to join in the fun! Instead of your regular tight lining or winged eyeliner look, graphic eyeliner designs involve a mixture of geometric shapes, vibrant colours and endless creativity. Think of your eye area as a canvas and start doodling away with colourful eyeliners! From bold ombre designs to wearable cloud graphic eyeliner look as seen on Jules in Euphoria, learn how to draw bold graphic eyeliner looks that are bound to turn heads — in a good way!
Our Recommendations
1. Ombre graphic eyeliner look
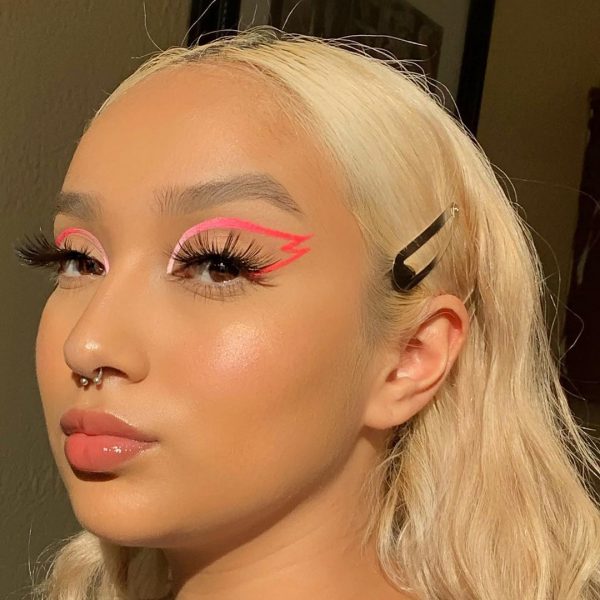
When you’ve got eyeliners in different shades, an ombre graphic eyeliner look is a MUST. This makeup look is created by connecting graduated hues from light to dark to achieve a seamless shade transition. Usually, ombre graphic eyeliner makeup looks are achieved using water-activated cake eyeliners. They work exactly like watercolour paints, where you simply mix the eyeliner with water and you’ll have a creamy liquid liner that glides on effortlessly! However, if you don’t own any water-activated cake eyeliners, you can also use coloured gel eyeliners, liquid liners or even eyeshadows as alternatives!
How to draw this graphic eyeliner look:
- Dust your eyelids with your regular loose powder or compact powder to mattify the lids. This creates a clean canvas that will help the graphic eyeliners stay on better.
- Start by outlining the arc with the white liner. You can do so by dotting the white liquid eyeliner (available on Miss Rose Official Store) from the inner corners of your eyes up until the first one-third of your crease line. Connect the dots and smooth out the line.
- Continue the arc with the HAIDAIYAN pastel pink liquid eyeliner (available on Princess AmyFashion) and draw it along the rest of your crease line. Ensure this line is equally thin as the line you’ve created with the white eyeliner.
- To blend the two shades together, mix both the pink and white liquid eyeliners on the back of your hand. Take a clean disposable eyeliner brush (available on Galaxy.sg) and apply the mixture quickly onto the connecting point between the two lines you’ve drawn previously.
- Using the Novo waterproof hot pink liquid eyeliner (available on Makeup Official Store), extend the crease line towards the end of your eyebrows by creating a flick towards your temples
- Repeat step four again by mixing both the pastel pink and hot pink liquid eyeliners together
- Returning back to the hot pink liquid eyeliner, complete the graphic eyeliner look by drawing a slanted ‘N’. Connect the graphic liner back to the outer corners of your eyes to finish up the look!
- Repeat step two to seven on the other eye
- All that’s left is to pop on some fake eyelashes and you’re good to go!
Pro Tip: Mistakes are bound to happen! Fix them and perfect your graphic eyeliner look with a concealer.
2. Cloud graphic eyeliner look
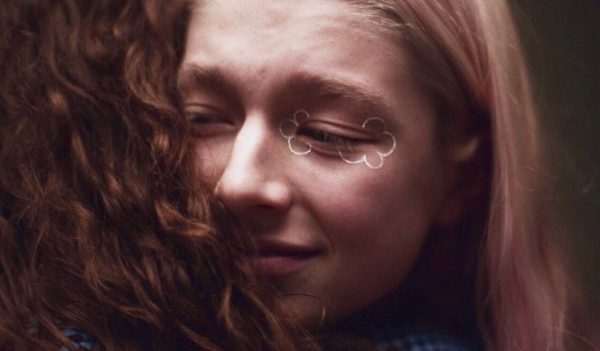
If watching American TV series Euphoria has got you feeling on cloud nine, you’ve got to give this cloud graphic eyeliner look a shot! Super cute and wearable, this look is a must-try for makeup amateurs. The steps are surprisingly easy and all you need is a white eyeliner to recreate this doodly style!
How to draw this graphic eyeliner look:
- Creating a clean base can help your white eyeliner pop even more. Begin by applying some concealer on your lids. Blend the concealer into your skin using your fingers or a concealer brush.
- Apply some translucent loose powder to set the concealer and mattify your lids
- Now, it’s time for the fun part — drawing the clouds! While you can use any type of white eyeliner, we suggest going with this white gel eyeliner pencil (available on conqueror888.sg). It’s beginner-friendly and super pigmented! Look straight ahead in the mirror and make a marking on the outer one-third of your upper left eyelid, right above your crease. This is where your cloud design will begin.
- Make a marking on the outer one-third of your lower left eyelid, right below your lash line. This is where your cloud design will end.
- From the starting point, draw four semi-circles in the likes of a cloud to frame the outer corners of your eyes. The last circle should end at the spot you marked on your lower eyelid previously.
- Repeat step three on the inner one-third of your upper left eyelid. This is the starting point of a smaller cloud design you’ll be drawing in the inner corner.
- Repeat step four on the inner one-third of your lower left eyelid
- Connect the dots by drawing three small cloud-like semi-circles in the inner corner of your left eye
- Repeat step three to five on the outer corner of your right eye, this time creating only three big semi-circles
- Coat your lashes with your favourite black mascara to create long and voluminous lashes
3. Floral graphic eyeliner look
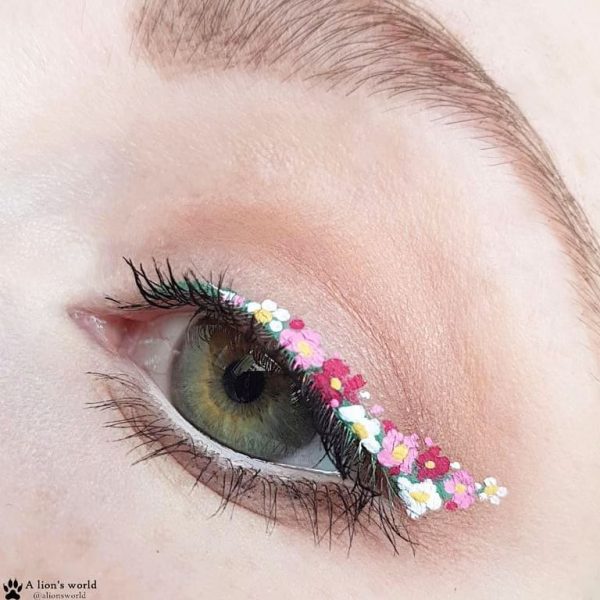
Ultra may not have taken place this year but that doesn’t mean you can’t flaunt a music festival look on regular days! This floral graphic eyeliner look is pretty and feminineand can be tweaked to include any of your favourite summer colours. Don’t be put off by the seemingly complicated design. You really don’t need much precision to recreate this fancy graphic eyeliner look!
How to draw this graphic eyeliner look:
https://youtu.be/1W-wOA-drdo?t=30
- The summer heat can potentially cause your beautiful floral graphic eyeliner look to smudge. Beat the heat by using the Urban Decay eyeshadow primer potion (available on Strawberrynet SG Official Store) on your lids to keep your eye makeup intact throughout the day!
- Using the Catrice kohl kajal 270 eyeliner (available on Maimee’s Corner), line your eyes thickly above your lash line, ending with a bold flick towards the tails of your brows
- Set the creamy eyeliner with the Avocado shade from the FOCALLURE green forest 9 colours eyeshadow palette (available on Focallure Official Store). Pat the eyeshadow onto the eyeliner you’ve drawn with the Xingxiang mink hair small flat eyeshadow brush (available on gali24852225.sg).
- To draw the flowers, start by creating some dots on the green line with the Lulaa kajal fluorescent yellow double eyeliner (available on attrayo). These dots mark where you want each bloom to be.
- Pick two or three coloured eyeliner shades of your choice. Alternating between the shades, draw an asterisk (*) on the yellow dots to create tiny flowers. You can choose to draw the blooms up till the tip of the liner flick or stop at the end of your lash line.
- Going back to the yellow eyeliner, dot it on the centre of each flower
- Apply some mascara and keep the rest of your makeup simple — your floral graphic eyeliner is the star of the day!
Pro Tip: If you’re feeling fancy and want to amp up this look even further, you can stick on some nail art diamonds (available on lovelty) onto the centre of each bloom using DUO false eyelashes and double eyelid transparent glue (available on PSF store).
4. Negative space graphic eyeliner look
Don’t own any coloured liners? Don’t fret, you can still create a chic graphic eyeliner look with your regular black eyeliner. This relatively toned-down look incorporates the negative space makeup trend which involves leaving part of the eyelid makeup-free. The result is a highly contrasted unpainted space that still pops!
How to draw this graphic eyeliner look:
- From the outer corner of your eyes, draw a thin flick with the Secret Key skinny real quick black eyeliner (available on SecretKey SG Official Store) towards the tail of your eyebrows. This eyeliner is perfect for this look as it boasts an ultra-fine tip for extra precision!
- Looking straight into the mirror, draw a line from the end of your crease line and connect it with the flick you’ve drawn in step one. This forms the tail of the graphic eyeliner. You can create a sharper look by extending the tail of the graphic eyeliner towards your temples.
- Line the rest of your eyes with a brown eyeliner, such as the Wet N Wild proline felt tip dark brown eyeliner (available on Laycy Official Store)
- For this look, we suggest skipping the falsies and using only mascara. This is because falsies tend to be longer and denser and may block your graphic eyeliner design.
5. Moon phase graphic eyeliner look
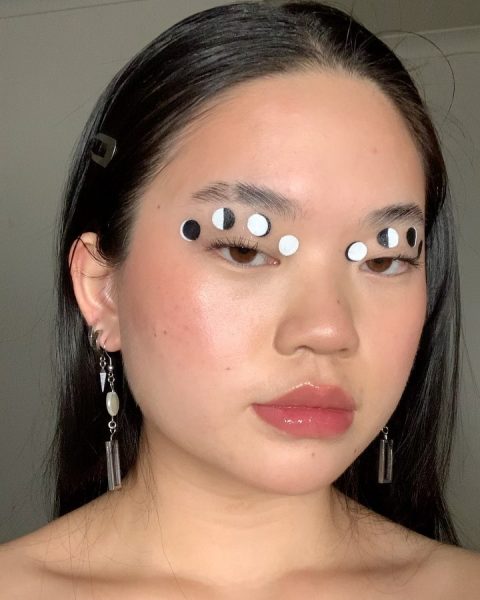
We won’t lie, this graphic eyeliner look is not for the faint-hearted. Neither is it for makeup beginners as drawing perfectly rounded circles on the eyelids can be more difficult than it seems. But if you’re up for the challenge, we’ve provided a comprehensive step-by-step tutorial for this funky graphic eyeliner look! Remember to have some cotton buds, makeup remover and concealer on hand to amend any errors along the way.
How to draw this graphic eyeliner look:
- Draw four dots on each of your upper eyelids using a white eyeliner pencil — one each at the most inner and outer corners of your eyes and two other above your irises. This look is perfect for ladies with mono lids as these have more lid space. Those with double eyelids have to draw the dots above the double eyelid line to ensure your design isn’t hidden when you open up your eyes.
- Using a soft circle stencil (available on E-Lifestyle), choose a circle size that fits your lid. Position the circle you want on the dots you’ve created and trace the shape using the NYX white liquid liner (available on shinjohn1027.sg). Colour in all the circles with the white liner.
Right eye:
- Starting from the second circle from the inner corner of your eyes, outline half of the circle with a black liquid eyeliner
- For the third circle, fill in half of the circle with a black liquid liner
- For the last circle, fill in three-quarters of the circle with the black liquid liner, leaving a small white C shape at the outer edge of the circle
Left eye:
- Begin with the circle on the most inner corner of your eyes. Outline half of it with a black liquid liner.
- Repeat step five for the next circle
- Repeat step six for the third circle
- Position the stencil on the last circle and fill in the entire shape with the black liquid liner
- As this graphic eyeliner look is quite dramatic, we suggest keeping your brows natural by grooming them in place with the Billion Dollar Brows clear brow gel (available on Strawberrynet SG Official Store). Avoid lining your eyes and only apply one coat of mascara on your lashes.
Level up your makeup game with us
Now that you’ve mastered these trendy graphic eyeliner looks, it’s time to venture into other aspects of makeup and beauty! Perfect your brows with our step by step guide to different brow shapes and show your lashes some TLC with these best eyelash serums. Don’t forget to check out our Shopee Beautyholics membership where you get to enjoy exclusive member vouchers and deals!


